Program Settings
Use Program Settings when you need one reusable profile that controls how a program collects donations, handles sponsorship rules, displays public pages, and gives donors or recipients access to account features. A setting profile can be attached to one program or shared by several programs.

Open Program Settings
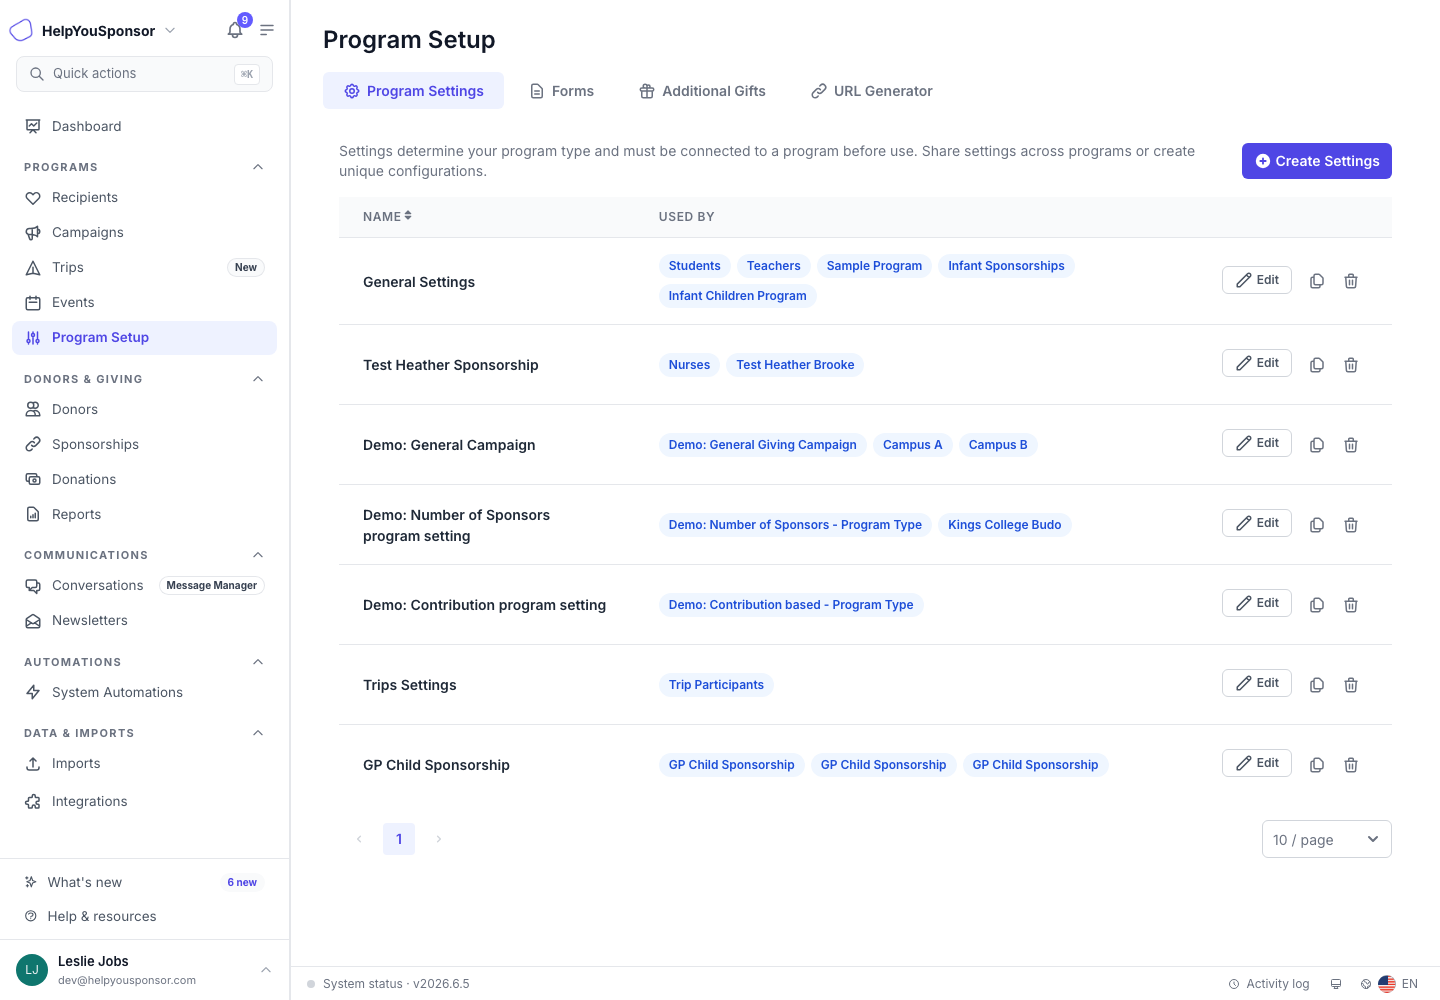
Program Settings lives under Program Setup at /app/program-settings.
Open Program Setup.
Select Program Settings.
Review the list of setting profiles.
The Program Setup area can include Program Settings, Forms, Additional Gifts, and URL Generator. The tabs you see depend on your account permissions.
The list shows each setting profile name and its Used By program tags. If a setting is not attached to a program, the list shows Not connected to any program. Use these tags before editing, cloning, or deleting a setting so you know which programs may be affected.
Create a Program Setting
Create a setting profile when a new program needs different donation rules, public-page behavior, or portal options from your existing programs.
Open Program Setup > Program Settings.
Select Create Settings.
Enter a name that explains how the setting will be used.
Choose the program type.
Configure the setting areas that apply to that type.
Select Save.

The program type is chosen when the setting is created. When you edit an existing setting, the program type is locked. If you need a different type, create or clone a setting and choose the correct type before saving it.

Choose the Program Type
Choose the type based on what donors or supporters are trying to do:
Contribution: use this when a recipient is fully sponsored after total contributions reach a target amount.
Number of Sponsors: use this when a recipient is fully sponsored after a specific number of sponsors commit.
Campaign: use this when donations support a cause or designation instead of sponsoring individual recipients.
Peer-to-Peer: use this for campaign-style fundraising with public recipient or participant pages.
Trips: use this for fundraising trips with participant pages and trip-specific controls.
Contribution and Number of Sponsors settings include sponsorship amounts and completion rules. Campaign, Peer-to-Peer, and Trips settings include donation targets, transaction amounts, and campaign-style donation options.
Configure Shared Settings
Most setting profiles share the same major areas. Configure them based on the donor workflow and public experience you want the attached programs to use.
Currency: the currency symbol is based on the account currency and is not edited inside the setting profile.
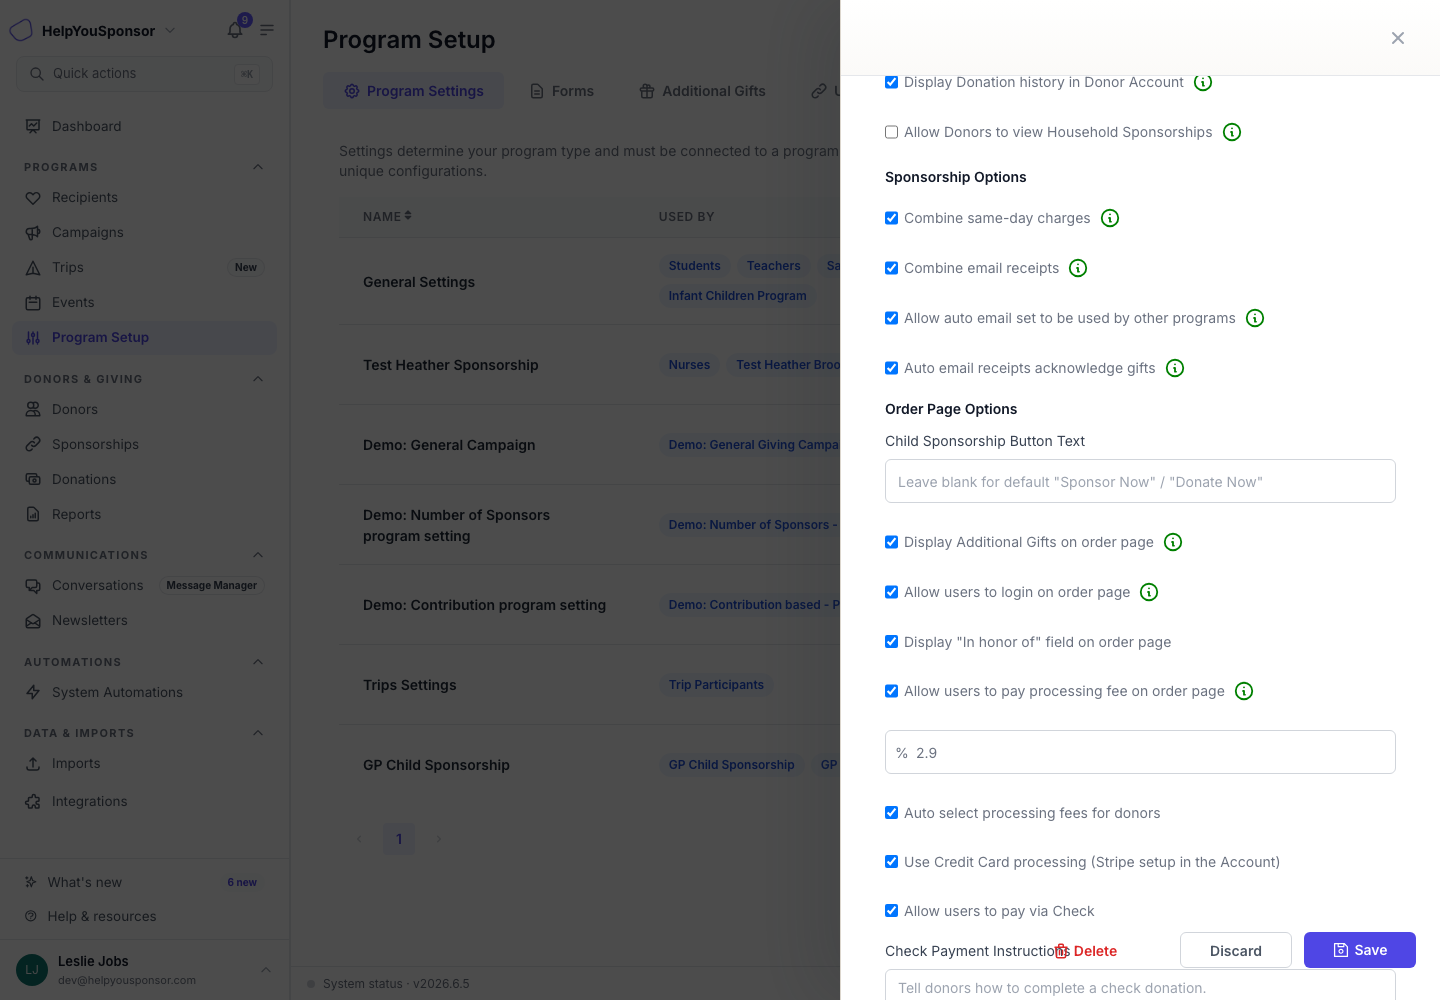
Donor Account Options: choose what donors can see and do when they log in to their donor account, including donation history, donor-to-recipient messaging, and related account tools.
Sponsorship Options: decide how sponsorship charges and receipts should be grouped, including combining same-day charges when commitments share the same payment method and charge date.
Order Page Options or Donation Page Options: control checkout behavior, button text, additional gifts, donor login, single-designation checkout for campaign-style pages, payment methods, processing fees, recurring options, and the In honor of field.
Front Page Options: control how recipients or designations appear on public listing pages.
Recipient Portal Options: decide whether recipient portal login fields, recipient-facing donor or donation views, and recipient-to-donor messaging are available.
Image Placeholder: choose the fallback image or placeholder behavior used when public pages need an image.
Rich Text Sections: add the text donors see on front pages, profile pages, order or donation pages, and donor account pages.

Configure Public Pages and Recipient Portal
Use the public-page settings when attached programs display recipients, campaign designations, or participant pages on your website.
Front page options can control:
recipient sort order
featured recipients
recipient waiting time
fully sponsored recipient visibility
single-recipient view
progress bars and sponsorship stats
sponsorship amounts
recipient bio display
photo blur or sticker options for recipient images
Recipient portal options can control:
whether recipient portal login and portal email fields are enabled on recipient forms
whether recipients can see donor and donation tabs
whether donation amounts appear in recipient portal donor or donation lists
how donor names appear in the recipient portal
whether recipients can submit messages to donors and whether those messages need admin approval

Configure the correct messaging direction
Donor-to-recipient and recipient-to-donor messaging are separate settings. Enabling one direction does not enable the other.
Open Manage for the sponsorship program, choose Advanced, then select Open Settings Editor. This opens the setting attached to that program. If the setting is shared, review which other programs use it before saving.
For a donor to message a recipient:
Under Donor Account Options, enable Allow Donors to message Recipients.
Save the setting and confirm the donor sees Message on the appropriate sponsorship card in their account.

This is not direct email between the donor and recipient. The message is routed through your organization's admin workflow so staff remain between the two parties.
For a recipient to message a donor:
Enable the recipient portal and the donor information the recipient needs to see.
Under Recipient Portal Options, enable Allow recipients to submit donor messages.
Keep Needs admin approval enabled when staff should review messages before they are sent.
Save the setting and test from the recipient portal.

If a messaging action is missing, confirm the program uses the setting you edited, the donor and recipient are connected by the expected sponsorship, the correct portal is enabled, and the checkbox for that message direction is on. Reload the portal after saving. If the action remains missing, contact support with the program name, setting name, message direction, and affected donor or recipient record.
Configure Peer-to-Peer and Trips Settings
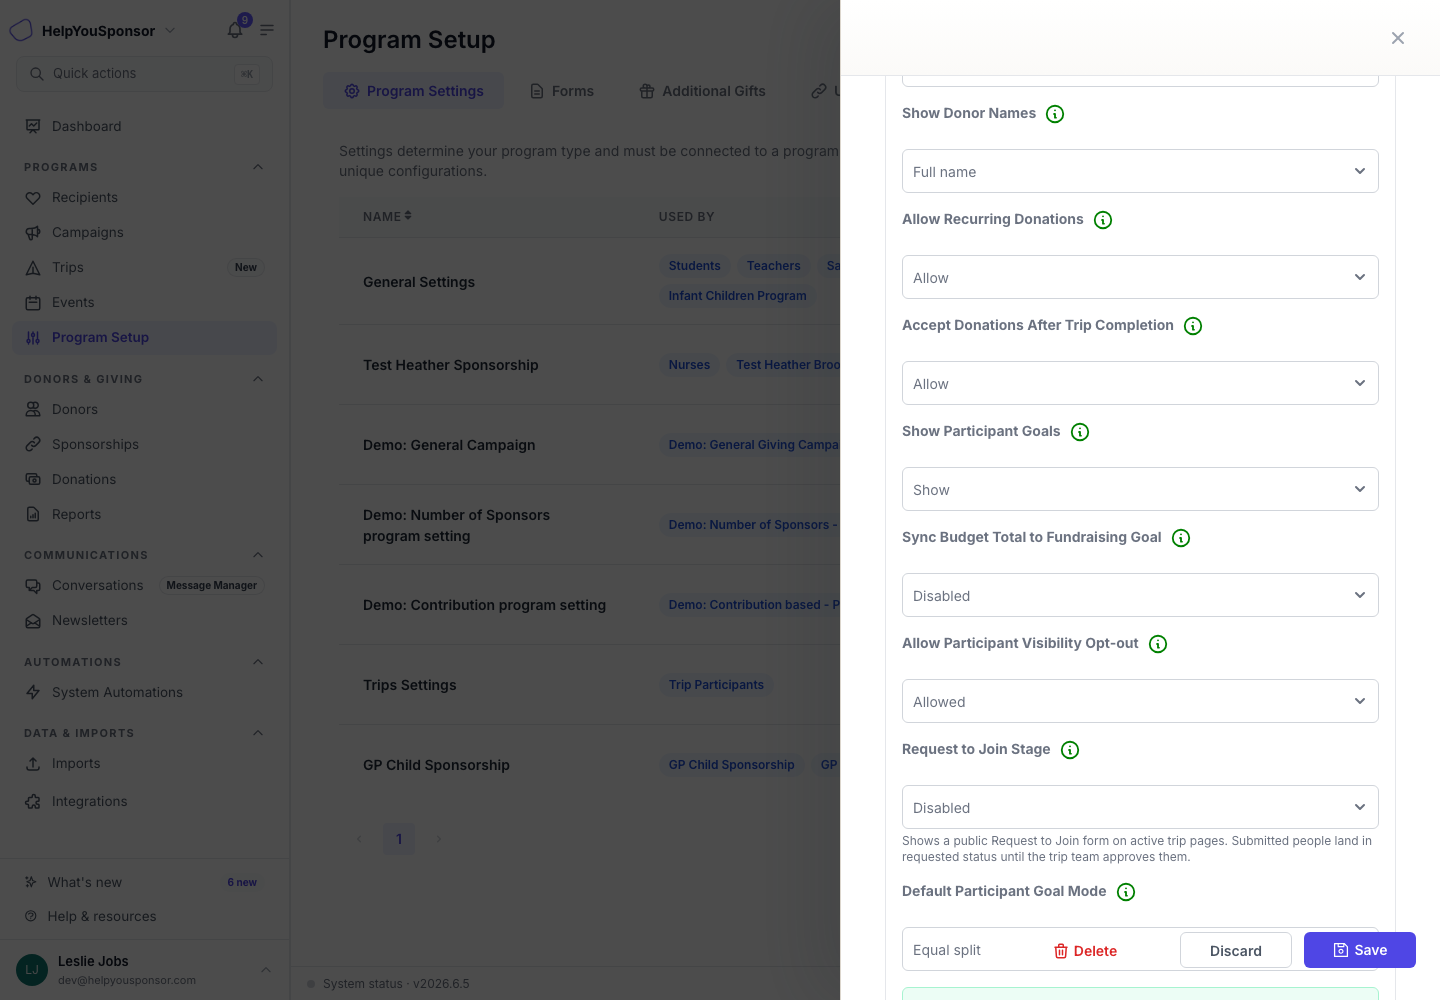
Peer-to-Peer and Trips settings add donation-page controls for public fundraising pages. These controls include whether donation amounts are visible, whether donor names are shown, whether recurring donations are allowed, and whether donations can continue after the goal or trip completion.
Trips settings also include trip-specific controls:
Show Participant Goals: show or hide participant goal amounts and progress.
Sync Budget Total to Fundraising Goal: keep the fundraising goal aligned with the trip budget total.
Allow Participant Visibility Opt-out: let participants hide their profile from public trip pages.
Request to Join Stage: show a public request-to-join form for active trip pages.
Default Participant Goal Mode: pre-fill participant goals by equal split, fixed amount, or manual entry.
Invitation Link Expiry and Task Reminder Days: set defaults for participant invitations and trip task reminders.

Add Program Text and Shortcodes
Use the rich text sections to guide donors through the public and donor-account experience:
Sponsorship Program Info or Donation Program Info appears with the public program or profile content.
Front Page Text appears above the public list of recipients, designations, or participants.
Profile Page Text appears on the public profile page.
Order Page Text or Donation Page Text appears before the donor confirms a sponsorship or donation.
Donor Account Text appears in the donor account for programs using the setting.
Shortcodes let you insert values from attached forms or program data into text areas and messages. If a shortcode is not available, check that the correct forms are attached to the program using the setting.
Edit, Clone, or Delete a Setting
Use the action buttons on the Program Settings list when you need to maintain an existing profile.
Edit updates the selected setting profile. Programs listed in Used By inherit the changes.
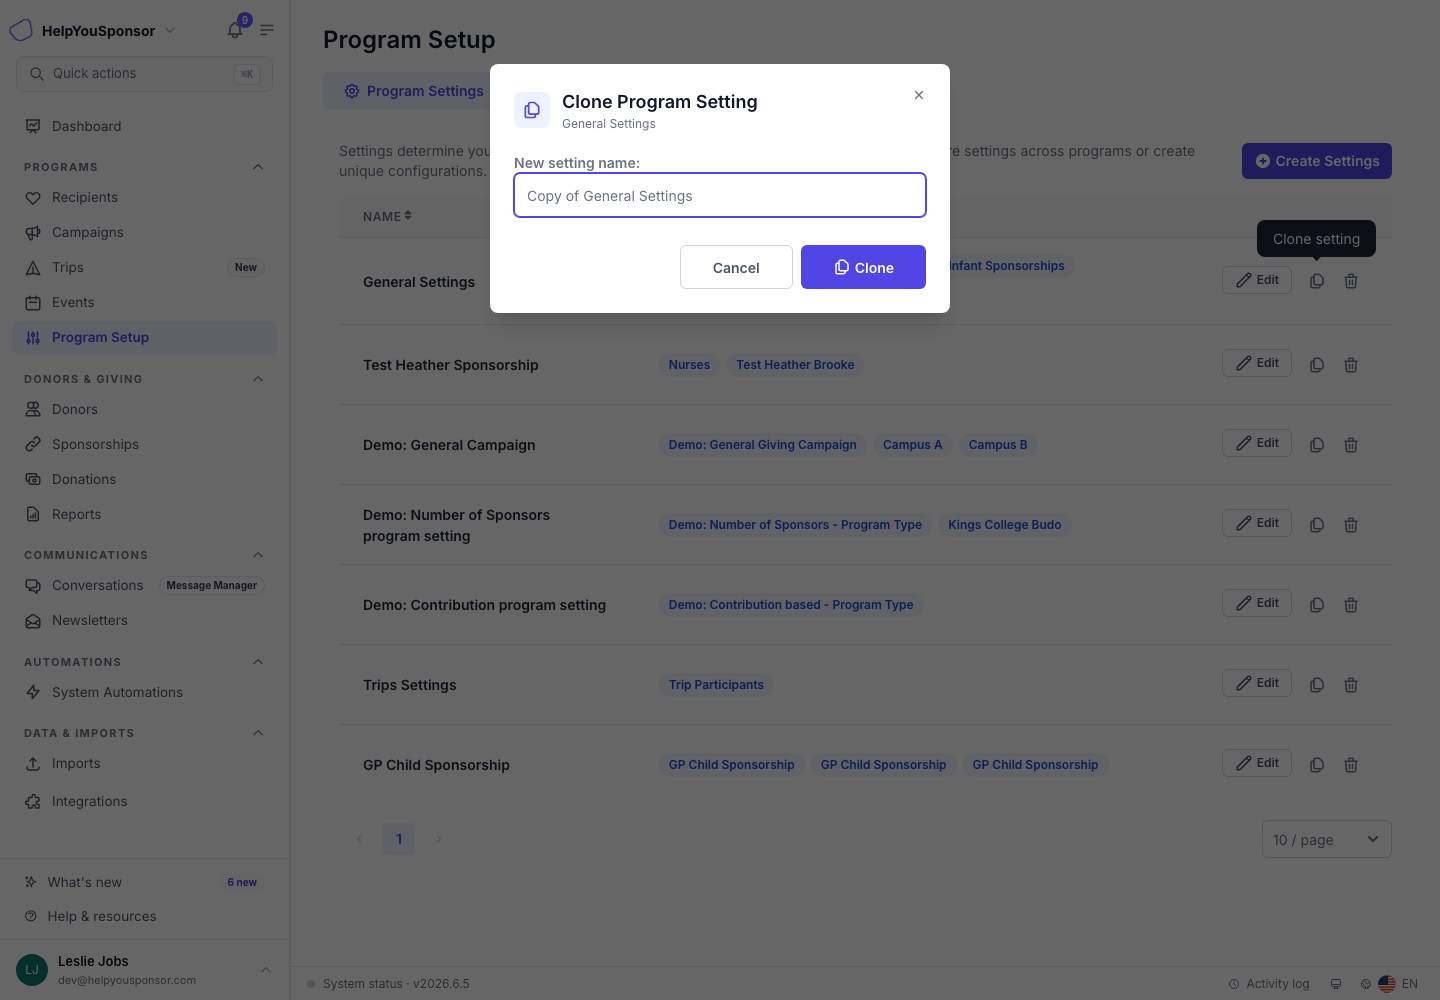
Clone creates a copy of an existing setting. Give the copy a clear name before editing it for a new program or workflow.
Delete removes a setting profile. Review the Used By tags first and delete only when the setting is no longer needed by active programs.

Cloning is safer than editing when only one program needs a different checkout, portal, or public-page experience. Deleting can remove configuration other programs expect to use, so confirm that the setting is not attached before deleting it.
Attach Settings to a Program
Creating a setting profile does not automatically make a program use it. Attach the setting from the program setup or manage-program workflow. The attached program then inherits the selected profile's sponsorship rules, checkout options, public-page display, recipient portal options, and rich text.
When several programs share the same setting profile, one edit updates all of them. Clone the profile first when a program needs its own version.
To view how the Combine same-day charges sponsorship option is used, refer to this video.
Related Guides
Last updated